https://www.bilibili.com/video/BV1Sb411s7qa
p1~9
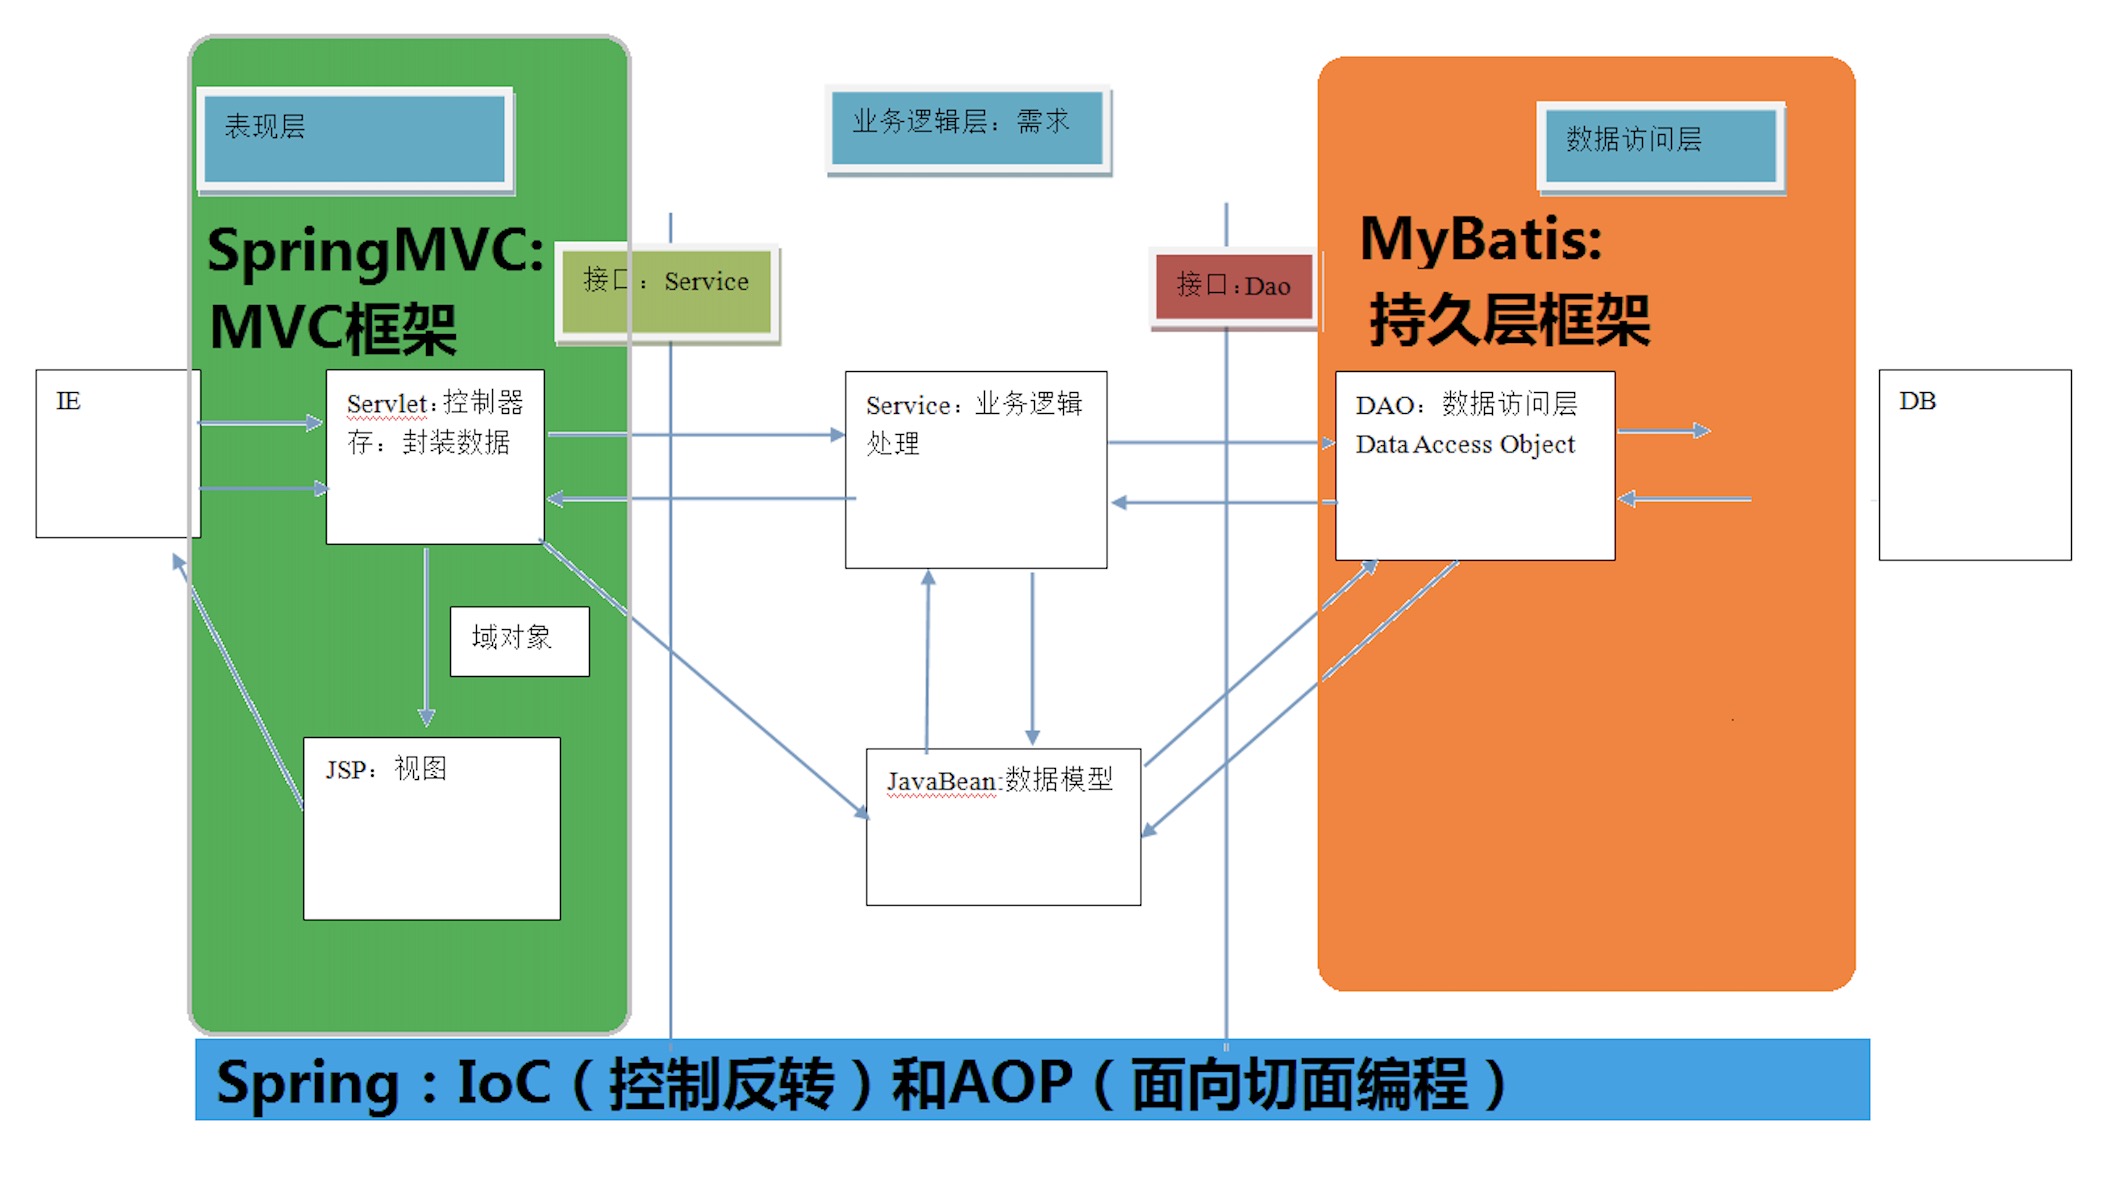
SpringMVC是一个基于Java的、实现MVC设计模型的、请求驱动类型的轻量级Web框架
使用Spring进行web开发时,可以选择SpringMVC,也可以集成其它框架如Struts2
它通过一套注解,让一个简单的Java类成为处理请求的控制器,而无需实现任何接口
支持RESTful风格的请求

入门案例
需求:
环境搭建
Idea创建Maven工程,选择webapp
maven项目创建时,可以加一组键值对archetypeCatalog : internal,解决加载慢的问题
建立的工程目录是不全的,在src/main下手动加上java、resource文件夹,并右键Mark Directory as设置为源码、资源文件夹
pom.xml
1
2
3
4
5
6
7
8
9
10
11
12
13
14
15
16
17
18
19
20
21
22
23
24
25
26
27
28
29
30
31
32
33
34
35
36
37
38
39
40
41
42
| <properties>
<project.build.sourceEncoding>UTF-8</project.build.sourceEncoding>
<maven.compiler.source>1.8</maven.compiler.source>
<maven.compiler.target>1.8</maven.compiler.target>
<spring.version>5.0.2.RELEASE</spring.version>
</properties>
<dependencies>
<dependency>
<groupId>org.springframework</groupId>
<artifactId>spring-context</artifactId>
<version>${spring.version}</version>
</dependency>
<dependency>
<groupId>org.springframework</groupId>
<artifactId>spring-web</artifactId>
<version>${spring.version}</version>
</dependency>
<dependency>
<groupId>org.springframework</groupId>
<artifactId>spring-webmvc</artifactId>
<version>${spring.version}</version>
</dependency>
<dependency>
<groupId>javax.servlet</groupId>
<artifactId>servlet-api</artifactId>
<version>2.5</version>
<scope>provided</scope>
</dependency>
<dependency>
<groupId>javax.servlet.jsp</groupId>
<artifactId>jsp-api</artifactId>
<version>2.0</version>
<scope>provided</scope>
</dependency>
</dependencies>
|
web.xml
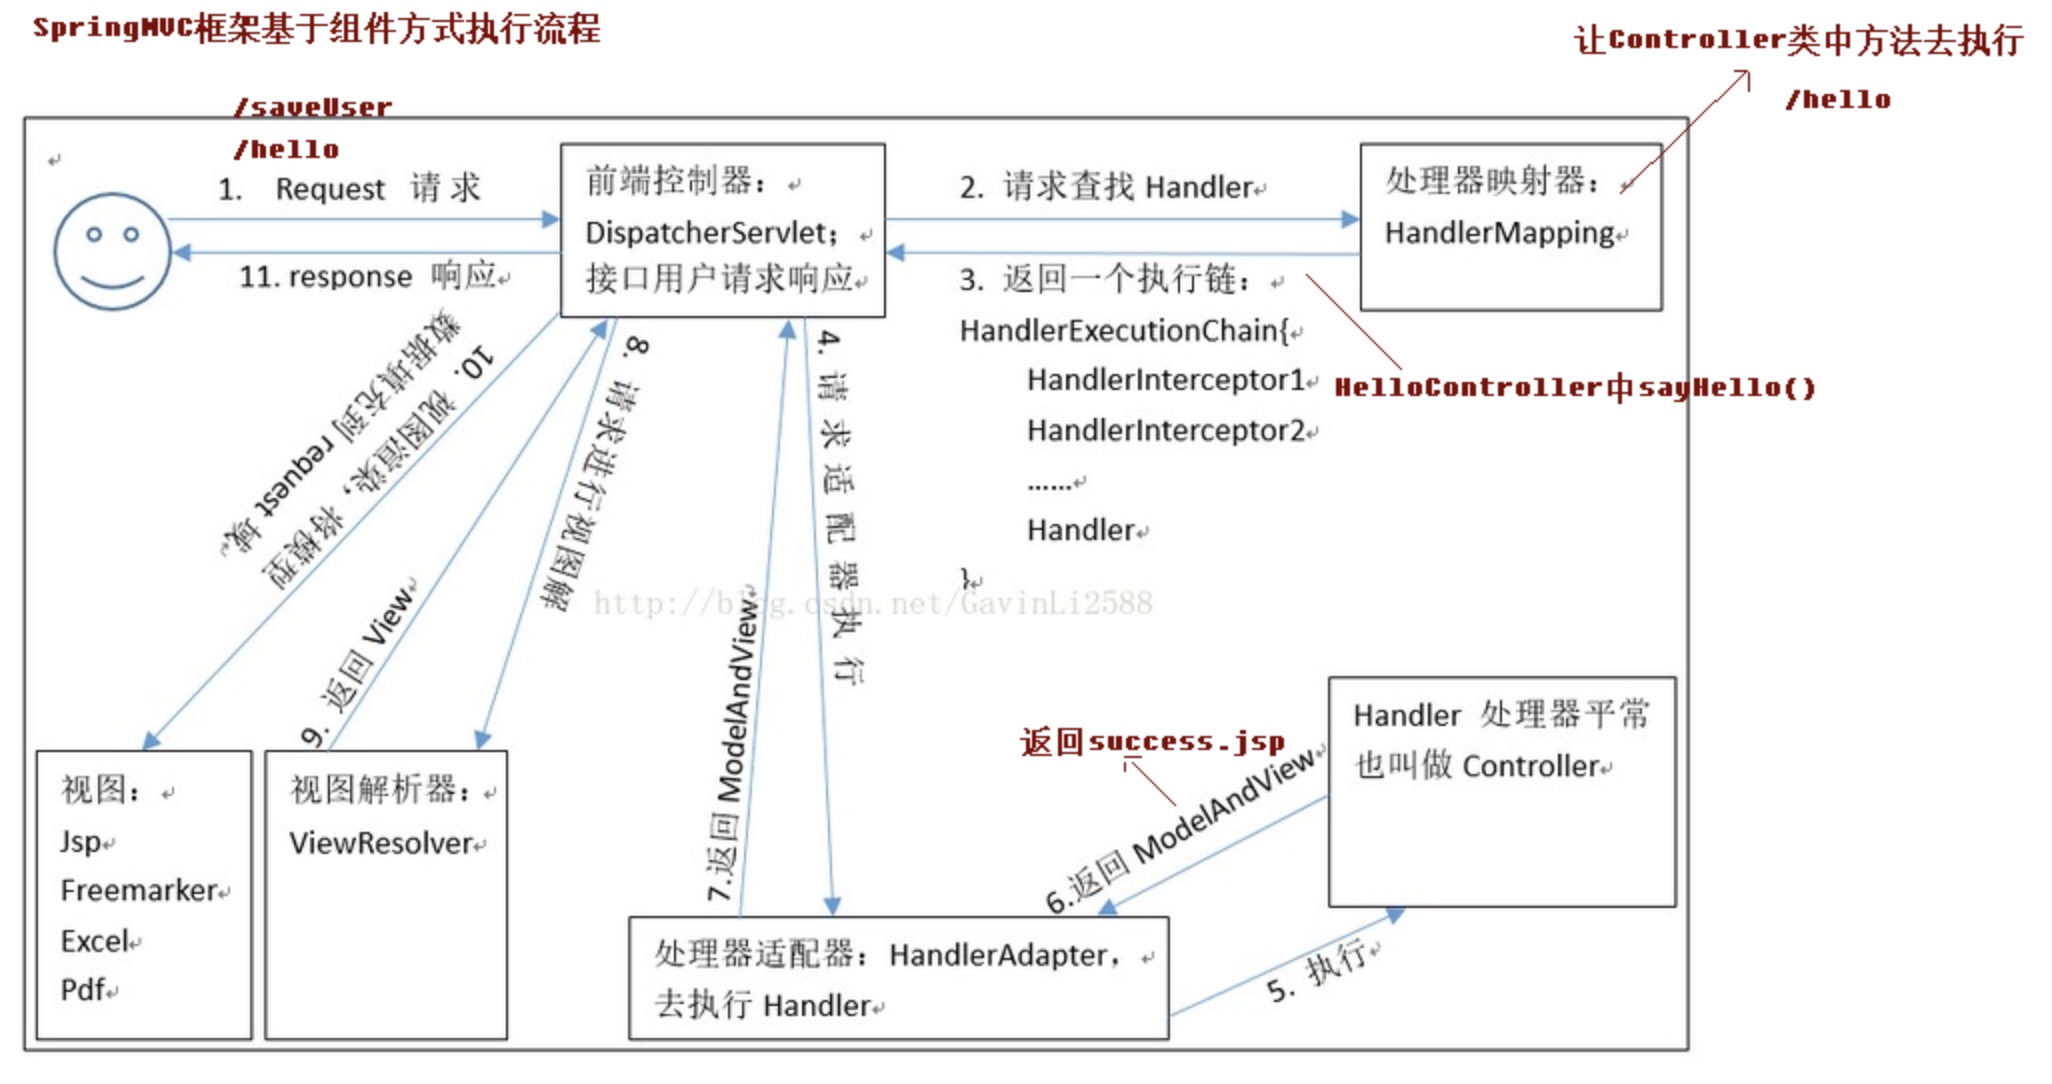
配置前端控制器(servlet)
1
2
3
4
5
6
7
8
9
10
11
12
13
14
15
16
17
18
19
20
| <web-app>
<display-name>Archetype Created Web Application</display-name>
<servlet>
<servlet-name>dispatcherServlet</servlet-name>
<servlet-class>org.springframework.web.servlet.DispatcherServlet</servlet-class>
<init-param>
<param-name>contextConfigLocation</param-name>
<param-value>classpath:springmvc.xml</param-value>
</init-param>
<load-on-startup>1</load-on-startup>
</servlet>
<servlet-mapping>
<servlet-name>dispatcherServlet</servlet-name>
<url-pattern>/</url-pattern>
</servlet-mapping>
</web-app>
|
springmvc的配置文件
在resources中New->XML Configuration File->Spring Config
名称没有要求,这里叫springmvc
导入名称空间,开启注解扫描
1
2
3
4
5
6
7
8
9
10
11
12
13
14
15
16
17
18
19
20
21
22
23
24
25
26
27
| <?xml version="1.0" encoding="UTF-8"?>
<beans xmlns="http://www.springframework.org/schema/beans"
xmlns:mvc="http://www.springframework.org/schema/mvc"
xmlns:context="http://www.springframework.org/schema/context"
xmlns:xsi="http://www.w3.org/2001/XMLSchema-instance"
xsi:schemaLocation="http://www.springframework.org/schema/beans
http://www.springframework.org/schema/beans/spring-beans.xsd
http://www.springframework.org/schema/mvc
http://www.springframework.org/schema/mvc/spring-mvc.xsd
http://www.springframework.org/schema/context
http://www.springframework.org/schema/context/spring-context.xsd">
<context:component-scan base-package="com.test"/>
<bean id="internalResourceViewResolver" class="org.springframework.web.servlet.view.InternalResourceViewResolver">
<property name="prefix" value="/WEB-INF/pages"></property>
<property name="suffix" value=".jsp"></property>
</bean>
<mvc:annotation-driven></mvc:annotation-driven>
</beans>
|
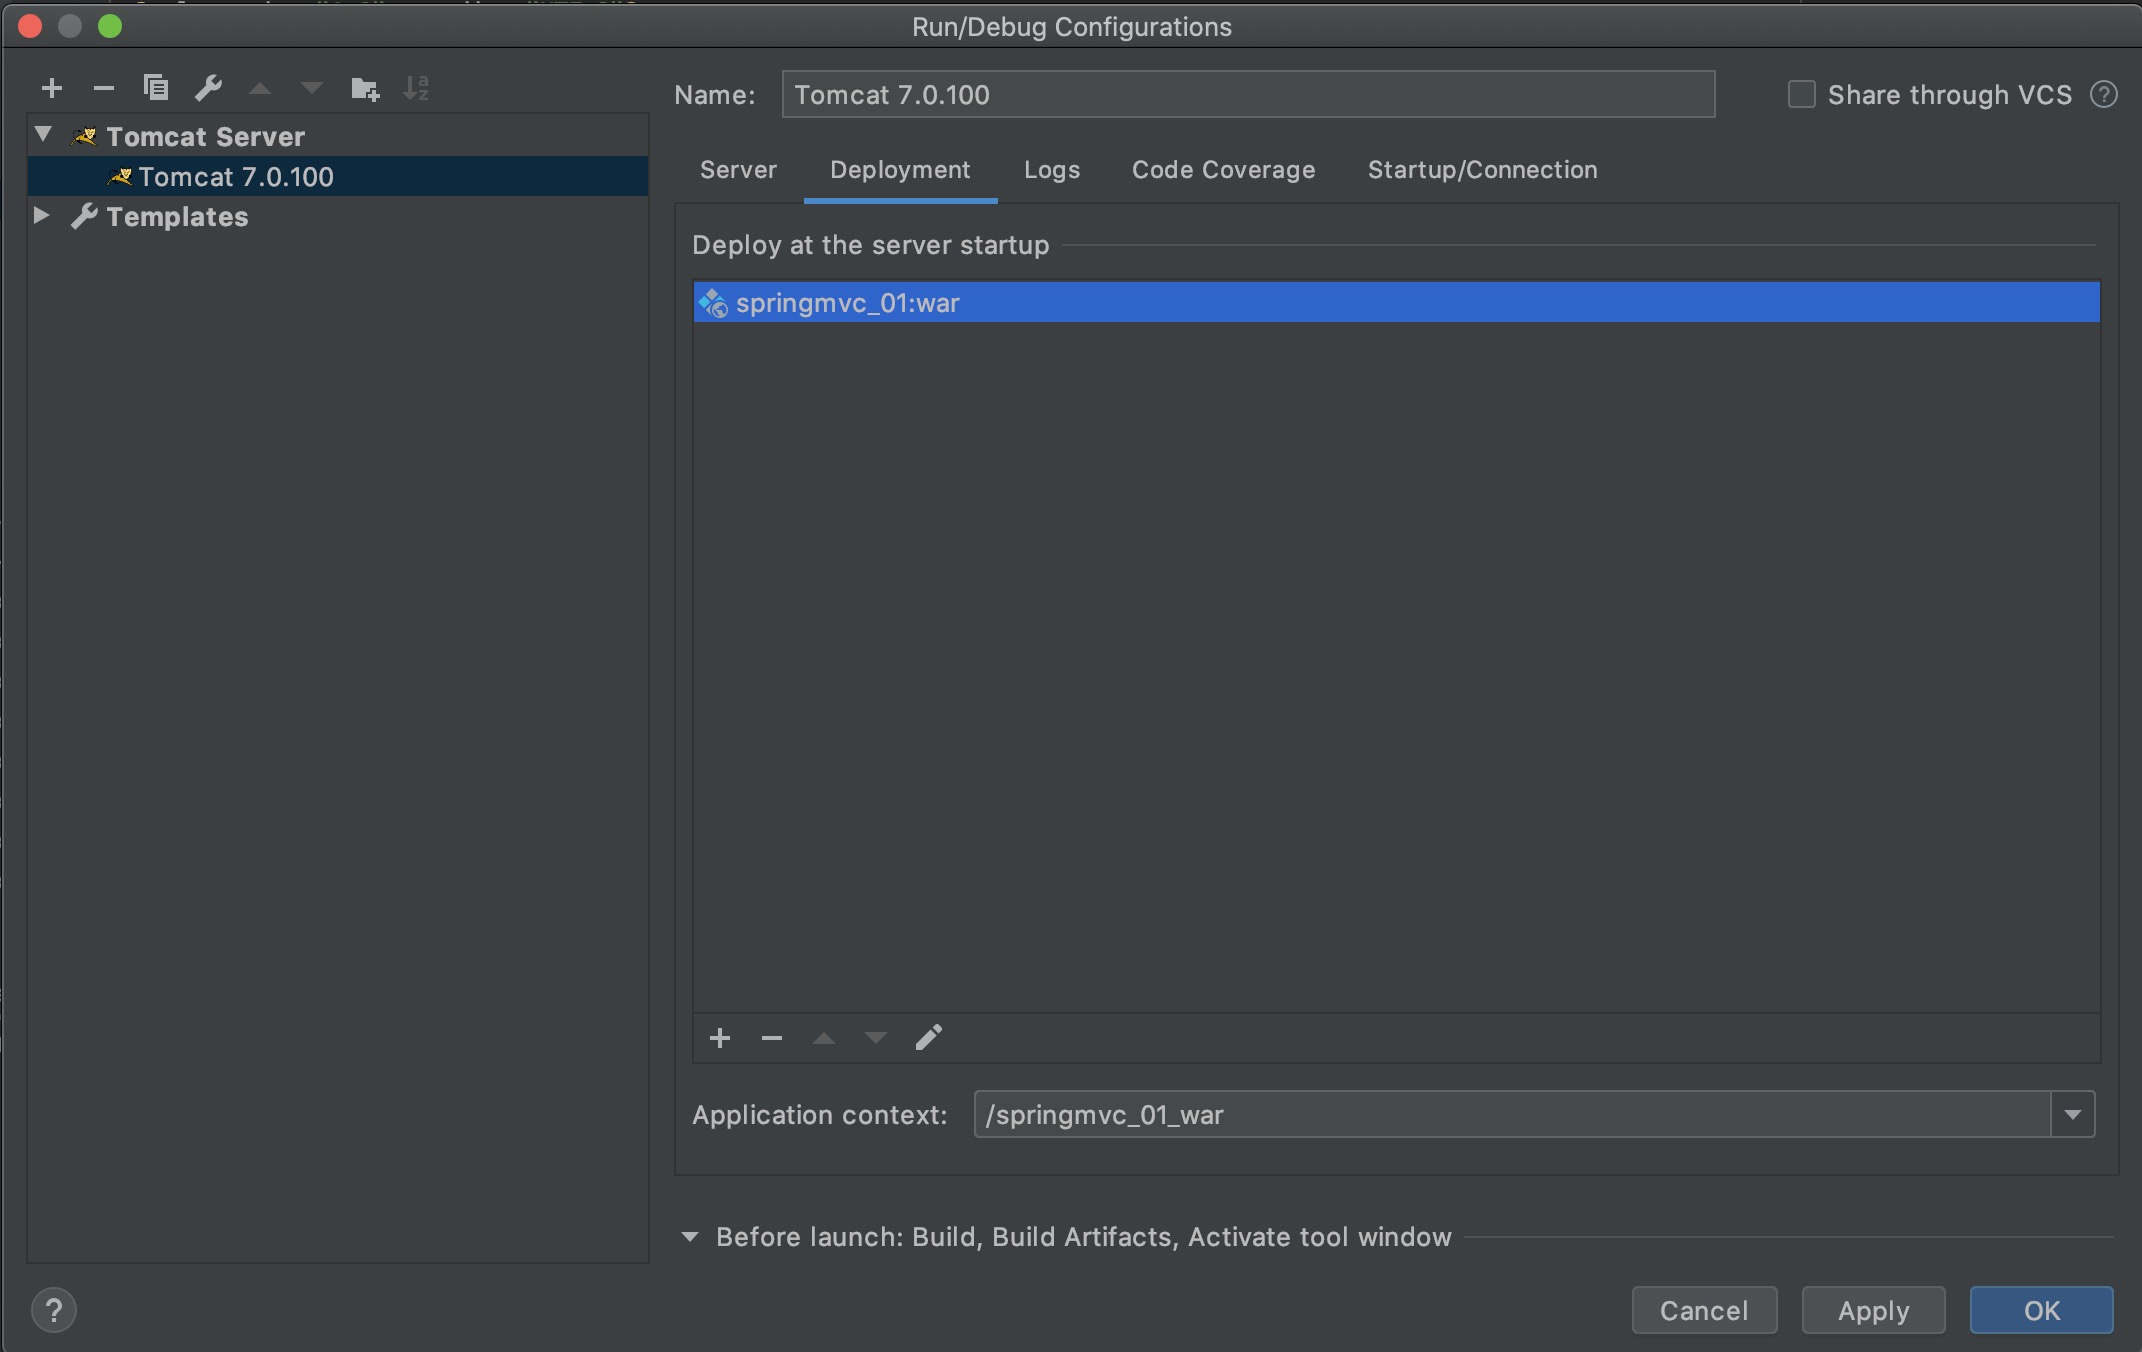
部署服务器
Add Configuration
加一个本地的Tomcat
在Deployment中添加
代码编写
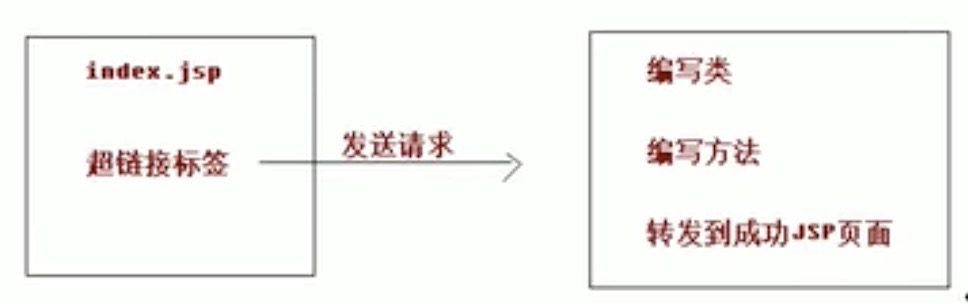
index.jsp
默认自带的index.jsp没有头文件信息,中文可能会有乱码问题
可以删了重新创建一个
1
2
3
4
5
6
7
8
9
10
| <%@ page contentType="text/html;charset=UTF-8" language="java" %>
<html>
<head>
<title>Title</title>
</head>
<body>
<h1>入门程序</h1>
<a href="hello">点这里</a>
</body>
</html>
|
HelloController.java
1
2
3
4
5
6
7
8
9
10
11
12
13
14
15
| package com.test.controller;
import org.springframework.stereotype.Controller;
import org.springframework.web.bind.annotation.RequestMapping;
@Controller
public class HelloController {
@RequestMapping(path="/hello")
public String sayHello(){
System.out.println("Hello Spring");
return "success";
}
}
|
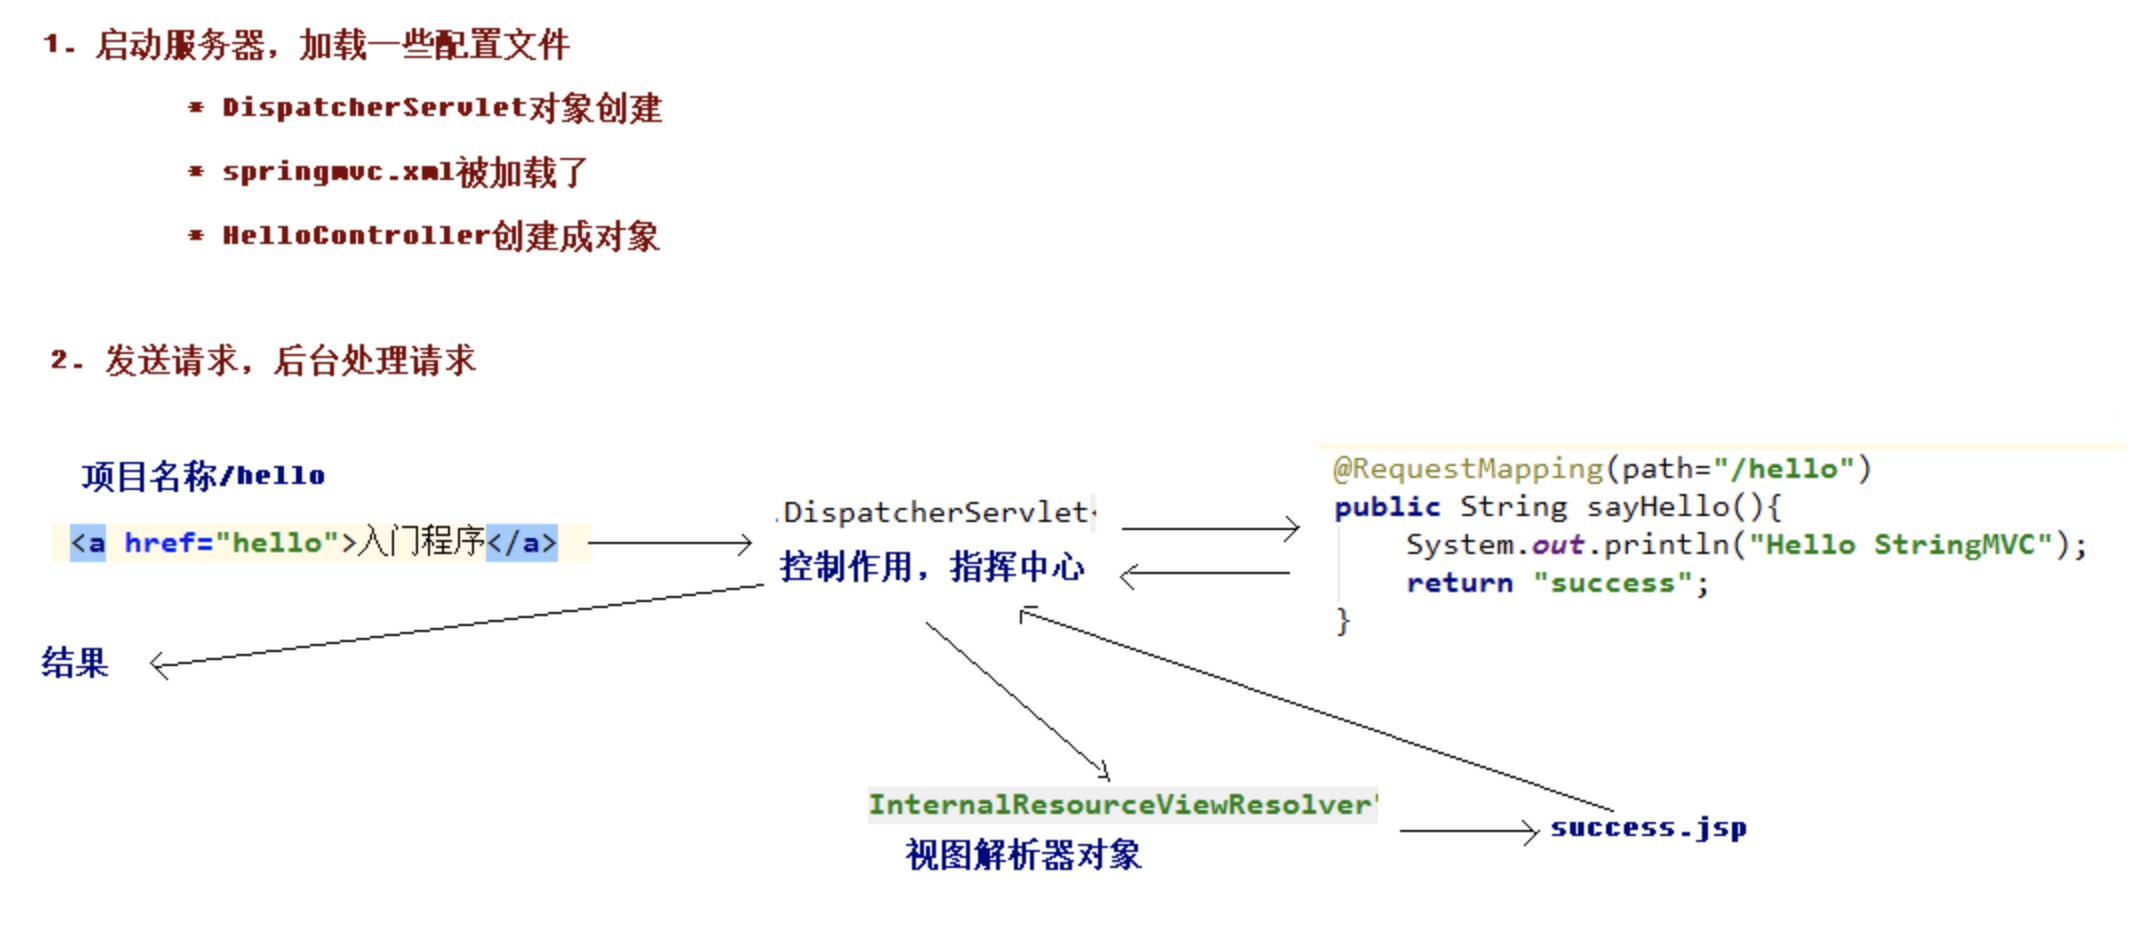
这里返回”success”,规则默认返回这个名字的jsp
success.jsp
可以在WEB-INF中新建pages文件夹,在里面新建success.jsp
加一个一级标题
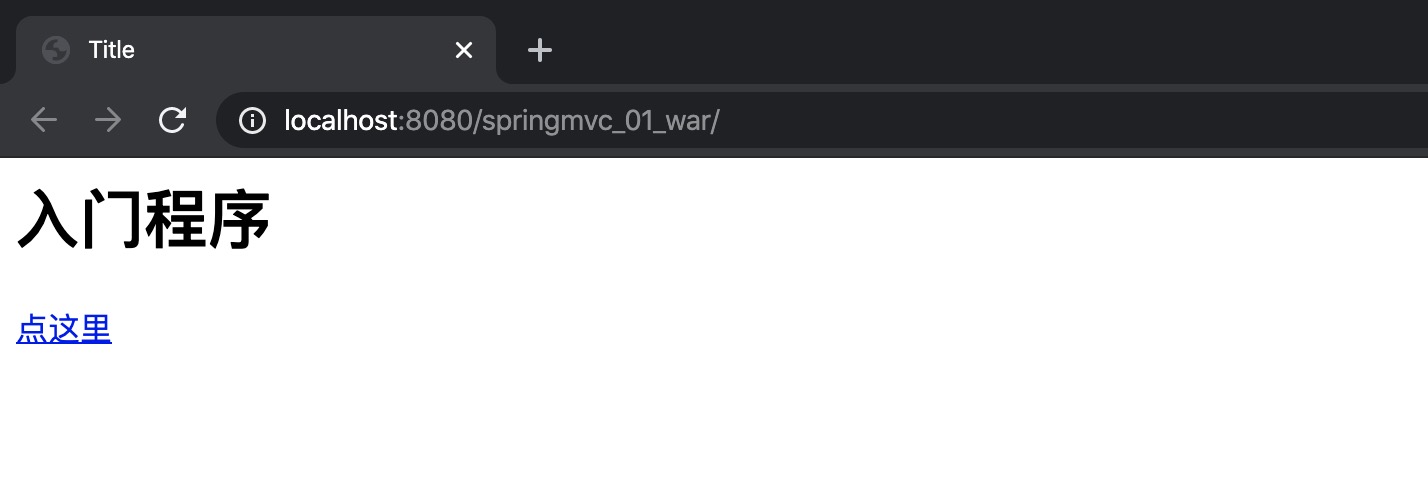
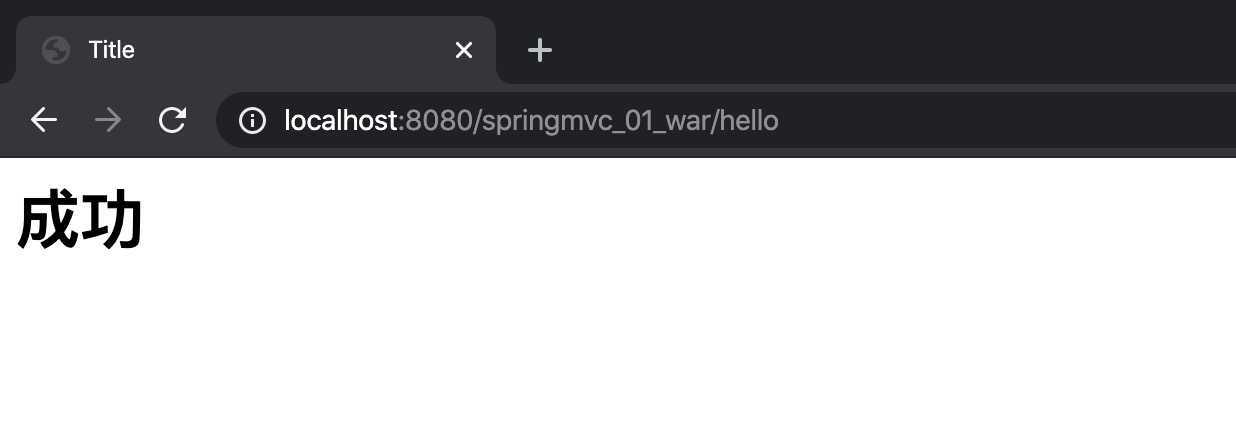
测试
点击
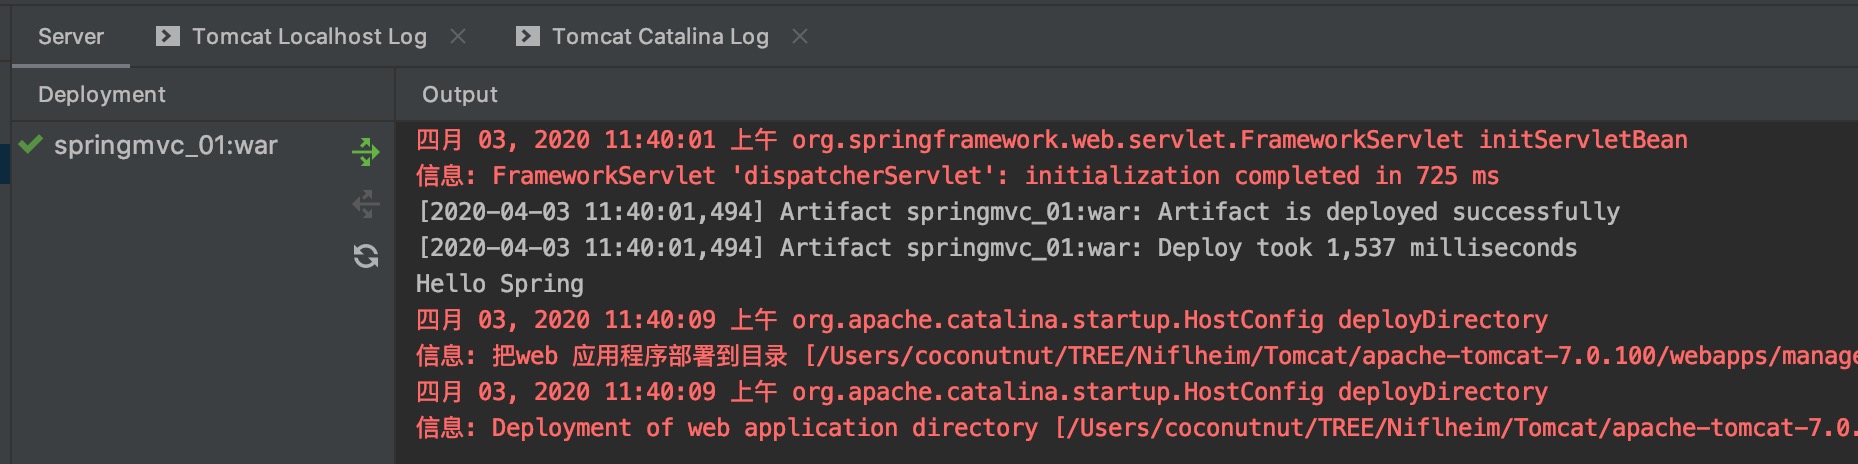
控制台输出
成功
入门案例流程总结
RequestMapping注解
作用
建立请求url和处理请求方法之间的对应关系
可以加在方法上,也可以加在类上(相当于一级目录)
如类上加”/user”,方法上加”/hello”,跳转时请求路径为”user/hello”
属性
path和value:作用相同,指映射路径,当只有value一个属性时,”value=”可以省略不写
method:指当前方法可以接受的请求方式,参数可以是数组,里面是枚举类型(如RequestMathod.POST)
params:用于指定限制请求参数的条件,支持简单的表达式(如params={“username=he”},表示请求参数中必须有username,且值必须为he)
headers:发送的请求必须包含请求头